One of the best ways to revamp your bathroom is by adding a new showerhead. While I wanted to install it myself, I wasn’t sure that I had the right skills. So, I did some research on the process that I would have to follow. Here’s what I found.
You can install a showerhead in seven simple steps. These are;
- Organize your Work Area
- Assemble your Supplies
- Remove the Old Showerhead
- Prepare the Area for the New Showerhead
- Clean the Area Around the Connection Point
- Fit the New Showerhead
- Test the New Showerhead
Installing a new showerhead doesn’t need to be difficult. In most cases, you’ll be done in under a few hours. Let’s take a closer look at each of these steps to make it easy for you to replace your showerheads.
Table of contents
How to Find the Right Showerhead?
There are literally hundreds of choices when it comes to showerheads and there are various configurations. Some of the most popular types are; Hand-held, Fixed, High-Pressure, Rain, and Low-Flow. Remember that many newer showerheads are designed to save water without sacrificing a satisfying shower experience.
Finding the right showerhead for you is a process of elimination. Hand-held or fixed? High-pressure, or low-flow? Hand-held units are very flexible and ideal for the elderly, while fixed units can’t be moved. Some are reasonably priced, and some are expensive. Find one that is within your budget and is in a style that you like.
The modern showerhead is anything but boring. Certain models have an extended range of features while others will evoke emotion. What you want is out there, though it might be a bit pricey. Before you buy, check the threads inside the showerhead unit. They should be in good condition.
How to Install a Showerhead?
When it comes to bathroom improvements, changing out a showerhead is among the easiest tasks. No need to hire a contractor, this is one DIY bathroom project that even a layperson can complete. All that is needed is a little know-how. Let’s look at the steps you’ll need to go through.
1. Establish and Organize your Work Area
Instead of jumping right in, it is best to ensure a clean and orderly work area. Bathrooms are small but things can still get misplaced and cause unnecessary frustration or injury. Set out an old towel on the counter, this will be where you place your tools and shower components. Put another towel on the floor of your tub to prevent damage if something falls.
2. Assemble your Supplies
With your new showerhead readily at-hand. You will also need the following: a roll of Teflon, or “pipe” tape; a set of Channel Locks and vice-grips; pliers; a wire brush or rough grade steel wool; scraping tool; a piece of leather or cloth. Avoid the temptation of bringing the entire toolbox with you should you have one because, in this process, simpler is better.
3. Remove the Old Showerhead
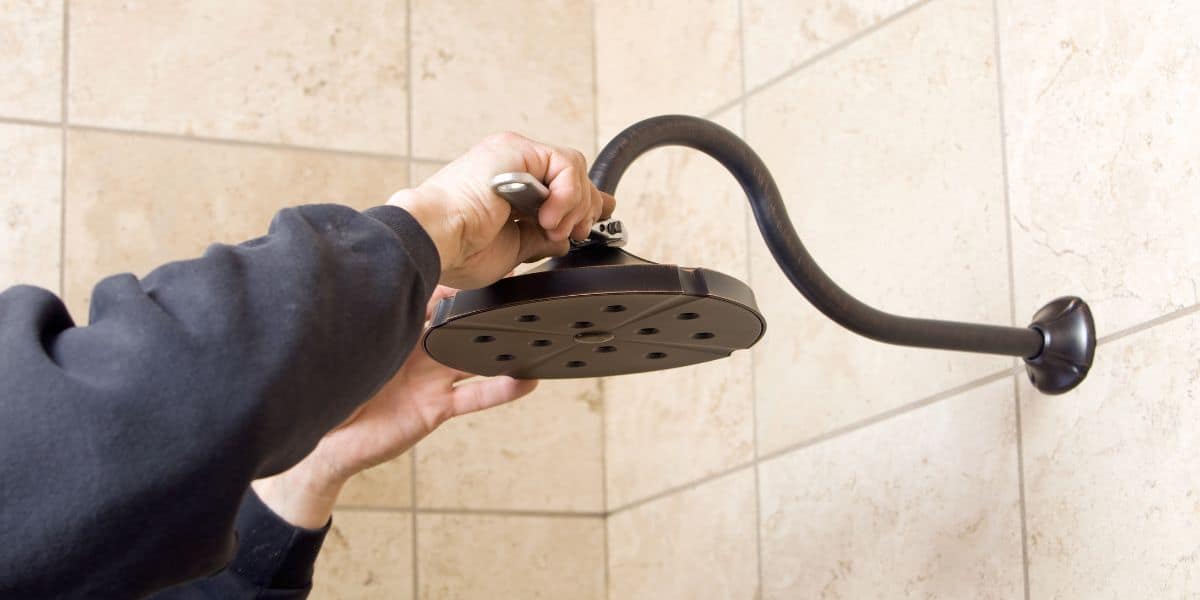
Ensure that the water is turned off! Then, take your channel lock pliers and start turning. For 99% of processes dealing with threaded objects, a clockwise motion tightens the threads and a counterclockwise motion loosens them. This concept is also known as “righty tighty, lefty loosey”.
If you do plan to re-use the old showerhead, place the piece of leather or cloth between the showerhead neck and the channel locks. This will help to avoid leaving unsightly marks on the metal. From here simply clamp down on the neck of the unit and start turning to the left. Now place the old showerhead out of your way.
4. Prep for the New Showerhead
The most important part of this phase is reading the material that comes with the new unit. It will explain basic features and advise on supplemental items that are included with the package. Get the items laid out in the order of assembly and begin cleaning the connection point.
5. Clean the Area Around the Connection Point
Clean the entire area around the connection point. You may find that the exposed threads at the connection point are corroded or clogged with old pipe tape. Use your wire brush or steel wool to scour these threads clean.
Check if the area nearest the connection has residual caulking around it. If so, take your scraper and peel this away taking care not to mar the surface.
Finally, wipe the entire area down so that you have a pristine connection point, this will make the next part of the job much less challenging.
6. Fit the New Showerhead
If you have correctly prepped the work area, installing the new showerhead will be a breeze. First, take your Teflon tape and wrap it clockwise around the threads. If you have never used it before, the tape can be a bit touchy. Get good contact with the tape on the pipe threads.
Take the new showerhead unit and any auxiliary components like washers or gaskets necessary. Slowly turn the unit until you feel the threads connect. Just a light pressure is all you need at this point. Once you feel the threads line up start tightening the unit. The turning should not be overly difficult at this point. If it is, unscrew the unit and make sure your threads are not stripping.
Continue to tighten the unit until the turning becomes difficult and then ensure your showerhead is facing downward. So far so good, you have replaced the unit.
7. Test the New Showerhead
Once attached, it is important to run the unit through some quick tests. What you are mainly checking for are leaks at the attachment point and possible obstructions to the water flow which can sometimes occur during assembly. Remove the towel and any other items from within the shower area.
Turn the cold-water on to its highest pressure and check for any leaks around your new seal. Turn off the cold-water and repeat the process with the hot water. Bring the cold-water back on with the hot water. If there are no leaks and no flow issues then congratulations, you have successfully installed your new showerhead!
8. Finish the Installation
It is now finally time to collect the old assembly and its associated pieces. If you have a box for these that is ideal. Place the old unit in the box and label it for future reference. Next, put away your tools. This may seem elementary, but the most common cause of lost tools is the failure to return them to their rightful place after use.
Save all the paperwork associated with your new showerhead unit. Ideally, you will have a common spot for all your equipment purchases. Make sure that you fill out and mail any warranty or rebate information as this could save you some money.
What are Some Other Things to Consider?
If you still do not feel comfortable replacing a showerhead then there is no shame in calling a professional contractor. If your house or building is quite old then you may be working with specialized piping that was commonly used in the past but is superseded by more advanced materials today.
Older piping such as ductile iron and galvanized iron piping tends to become quite brittle as they age. A professional may be able to suggest the correct approach in a situation like this.
Overall, then, this process has many steps but none of them are overly taxing even for the least mechanically inclined of us. Some preparation, some planning, and some patience will help this project, and many others, go smoothly and routinely in the future. Also, having a helper nearby to supply you with the right parts and tools will help the process go that much quicker.
Conclusion
Changing a showerhead doesn’t need to be a difficult task. As long as you follow these steps, you’ll be able to complete the job in less than a couple of hours.


